Parallax Image Generation Script
sgdk_parallax_image.py is a simple Python script that creates endless scrolling images for use with Sega Genesis / SGDK. You must supply at least one 16-color indexed image to be warped into a repeating floor pattern. The generated image can optionally have a ceiling pattern. The ceiling can use the same image as the floor or a separate image can supplied for the ceiling pattern.
Dependencies
The script was written for Python3 and requires numpy, PILLOW, and OpenCV.
I’m using WSL and Ubuntu 22.04 as my development machine, but I imagine most people will be using Windows. I’m going to keep on using WSL, but I have installed the windows versions to test the script.
- Get Python3. I used the Microsoft Store version.
- Install the dependencies. I opened a command line window and typed:
pip3 install numpy
pip3 install pillow
pip3 install opencv-python- Run the script with:
python3 sgdk_parallax_image.pyBasic usage
usage: sgdk_parallax_image.py [-h] [-v] [-f ARG] [-n ARG] [-s ARG] [-e ARG]
                              [-i ARG] [-S ARG] [-E ARG] [-I ARG] [-o ARG]
                              [-p ARG]

Create parallax scrolling background for SGDK

options:
  -h, --help            show this help message and exit
  -v, --verbose         increase output verbosity
  -f ARG, --far_image_reps ARG
                        How many times to repeat image at far side of floor
  -n ARG, --near_image_reps ARG
                        How many times to repeat image at near side of floor
  -s ARG, --start_row ARG
                        Which row starts the floor
  -e ARG, --end_row ARG
                        Which row ends the floor
  -i ARG, --input_filename ARG
                        input image filename
  -S ARG, --start_ceiling_row ARG
                        Which row starts the ceiling
  -E ARG, --end_ceiling_row ARG
                        Which row ends the ceiling
  -I ARG, --input_ceiling_filename ARG
                        input ceiling image filename
  -o ARG, --output_filename ARG
                        Output filename
  -p ARG, --project_directory ARG
                        Create project directory with resource files and simple SGDK code.
Examples
Floor with two near repetitions and four far repetitions
The default behavior is to take an input image named “image.png” and repeated it twice at the bottom row of the image (row 223) and four times at the top of the floor pattern (row 80). Type
python3 sgdk_parallax_image.py This generates an image called bg.png and should output text similar to the following.
Scroll width far: 80.000
Scroll width near: 160.000
Starting row floor: 180
Ending row floor: 223
* Scroll increment floor: 0.0233
* Final Scroll increment floor: 1.8605
Image size 480 x 224
The output gives you information you can use to scroll the image:
- Scroll width far 80.000 : The repeated image takes up 80 pixels at the top row of the floor.
- Scroll width near 160.000 : The repeated image takes up 160 pixels at the bottom row of the floor.
- Starting row floor 180 : The floor starts at row 180 in the output image
- Ending row floor 223 : The floor ends at row 223 in the output image
- Scroll increment floor 0.0233 : The amount each successive scroll line should increase if you’re scrolling the top row by one pixel.
- Final Scroll increment floor 1.8605 : The amount each floor row differs by before the scroll values needs to be reset.
- Image size 480 x 224 : The size of the output image.
If you want the floor rows to scroll right to left, you’d move row 80 left by one pixel, row 81 left by 1.0233 pixels, row 81 by 1.0466, pixels, and so on.
  ++scrollStep;
  fix32 fStep = FIX32(1.0);
  for( u16 row=180; row<224; ++row ) {
    fscroll[row] = fix32Sub( fscroll[row], fStep ); // shift row left
    fStep = fix32Add( fStep, FIX32(0.0233));        // change shift by 0.0233 pixels
  }
This works up to 80 pixels for the top row. This is because the output image only has enough pixles drawn to scroll one repetition. To handle this, reset the scroll values when the top row has moved 80 pixels.
    scrollStep = 0;
    memset(fscroll, 0, sizeof(fscroll)); // zero out all scroll values
Put together, they look like this:
static scrollLeftLoop() {
  ++scrollStep;
  fix32 fStep = FIX32(1.0);
  if (scrollStep < 80) {
    for( u16 row=180; row<224; ++row ) {
      fscroll[row] = fix32Sub( fscroll[row], fStep );
      fStep = fix32Add( fStep, FIX32(0.0233));
    }
  } else {
    scrollStep = 0;
    memset(fscroll, 0, sizeof(fscroll));
  }
}
Scrolling the floor left to right is similar. The main difference is you move the rows in the opposite direction. Row 80 moves to the right by one pixel, row 81 right by 1.0233 pixels, row 81 by 1.0466, pixels, etc.
  --scrollStep;
  fix32 fStep = FIX32(1.0);
  for (u16 row = 180; row < 224; ++row)
  {
    fscroll[row] = fix32Add(fscroll[row], fStep);
    fStep = fix32Add(fStep, FIX32(0.0233));
  }
Again, this only works up to 80 pixels for the top row. Resetting the scroll lines is a bit more complex here. You have to put all of the lines at their Final scroll position. This can be computed with the ‘final scroll increment’ value output from the script. Recall the value for the final scroll increment from the script.
* Final Scroll increment floor: 1.8605
    scrollStep = 80;
    fix32 scroll = FIX32(-80.0);  // scrolled by 80.
    for (u16 row = 180; row < 224; ++row)
    {
      fscroll[row] = scroll;
      scroll = fix32Sub(scroll, FIX32(1.8605)); // decrement by final value
    }
Put together, they look like this:
static scrollRightLoop()
{
  --scrollStep;
  fix32 fStep = FIX32(1.0);
  if (scrollStep >= 0)
  {
    for (u16 row = 180; row < 224; ++row)
    {
      fscroll[row] = fix32Add(fscroll[row], fStep);
      fStep = fix32Add(fStep, FIX32(0.0233));
    }
  }
  else
  {
    scrollStep = 80;
    fix32 scroll = FIX32(-80.0);
    for (u16 row = 180; row < 224; ++row)
    {
      fscroll[row] = scroll;
      scroll = fix32Sub(scroll, FIX32(1.8605));
    }
  }
}
Floor with four near repetitions and 6 far repetitions
You can increase the number of image repetitions with the -f and -n parameters. To have six repetitions at the far side of the floor and four repetitions at the near side run these parameters:
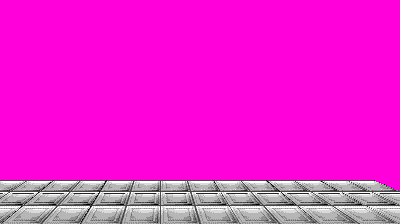
python3 sgdk_parallax_image.py -i test_tile.png -f 6 -n 4 -o tilefloor.pngI also specified a different floor image with the -i parameter and changed the output filename with -o. 
Add a ceiling
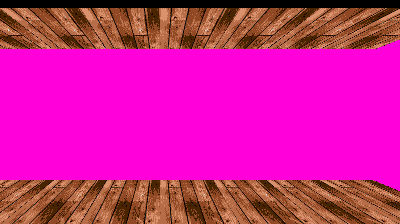
Adding a ceiling can be done by specifying the start (-S) and end (-E) rows for the ceiling.
python3 sgdk_parallax_image.py -i test_wood.png -f 6 -n 4 -S 8 -E 48 -o woodceil.png
Add a ceiling with its own tile images
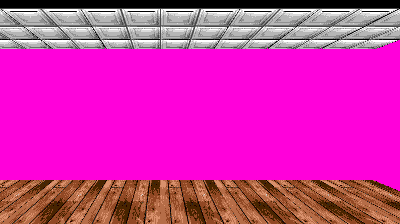
Specifying -I lets you add a second image for the ceiling.
python3 sgdk_parallax_image.py -i test_wood.png -f 6 -n 4 -S 8 -E 48 -I test_tile.png -o woodfloor_tileceiling.png
Create an example project
Specifying a folder with the -p parameter will create a project folder with files for SGDK. If your environment is setup correctly, the project files can be built with:
%GDK%\bin\make -f %GDK%\makefile.gen


